|
Running Existing Reports |

|

|
|
|
Running Existing Reports |
|
|
Running Existing Reports
|
Running Existing Reports |
|
|
|
|
Running Existing Reports |
|
|
Select Report From Desktop
To run an existing report from the Captools/net desktop, select Reports / Run Report, to obtain the nested menus for reports:
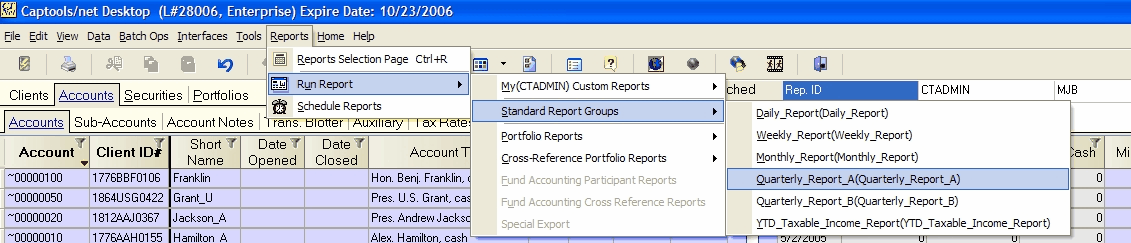
This menu allows you to select from either "standard" reports which were shipped with Captools/net or from custom reports that you, or rep's assigned to you, have created. Because Captools/net provides so many reports and also permits report customization, the report menu groups these reports by categories User Reports and Standard Reports, where User Reports are those that you have customized, and Standard Reports are those that are as they have been provided by Captools Co. The Standard Reports are further sub-categorized into Portfolio Reports, Cross-reference Portfolio Reports, etc. where each category has it's own listing of reports from which to choose.
Once you've selected the desired report, your IE browser will open and report generation will proceed as described below in Run Reports Specifications
To select the report from the browser, click on the Reports/Report Selection Page command in the Desktop program (see above) or click on the Create/Generate Reports command on the Captools/net Home page (see Accessing Reports). This will take you to the Captools/net Report Selection browser dialog. This page, shown below has two sections, "User Reports" and "Standard Reports".
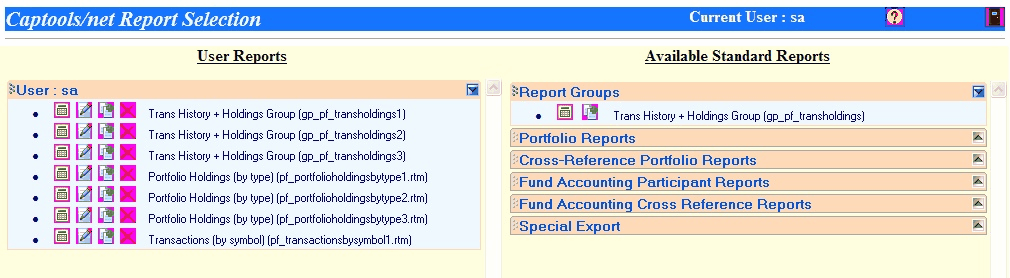
User Reports - These are report templates that you have cloned from Standard Reports and have further customized to meet your particular requirements. These reports are listed by user Rep Id. If you only have log-in rights to your own data and reports, you will only see reports that you have customized. If your log-in rights allow you to access reports generated by others, than you will also see these reports available to be run.
Standard Reports - Since Captools/net offers a wide variety of data fields that may be used in its reports, it is impossible to provide every possible combination and permutation of data fields and report types. Standard reports are intended to offer examples of the types of reports that are similar to what many users would want to run. However, by no means is it expected that they will meet the needs of most users. Standard reports can be the basis from which you build your custom User Reports.
Standard reports are categorized based upon the type of report. Clicking on the control button on the right of each category will open that category to allow you to select a standard report to be cloned and further customized:
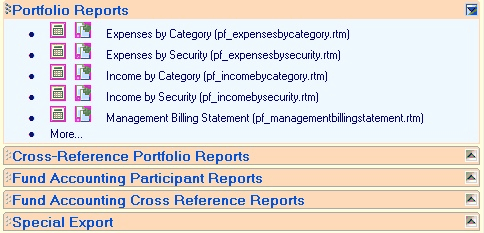
This displays an alphabetized list of available standard reports (click on "more" to see entire list).
Most users will use Portfolio Reports and Cross-Reference reports. Portfolio reports are intended to be run against one account or perhaps several accounts related by a common tax identifier or family membership. The data from these related accounts will be combined into a single report which is typically used to report to your clients. Cross-reference reports are intended to be run against a large number of non-related accounts in order to allow you to generate investment management metrics, such as composite performance data suitable for marketing purposes. Cross-reference reports are also useful to generate security holdings and transactions information relating to all accounts under management such as might be required in an audit. Fund Accounting and Special Export reports pertain to special situations discussed elsewhere.
Report Templates - Report "templates" store information regarding the data fields, user options and report layout, fonts, and colors that Captools/net uses to generate the report. The template data is stored on the server in the \Webscripts\Report folder using a filename ending in ".rtm". In the above examples these filenames are shown in parentheses adjacent to the report name. The computational logic used to generate the report are determined based upon the standard report from which the template was derived.
Report Groups - Users of the Professional and Enterprise versions can create "Report Groups". These specify that two or more report templates be run sequentially for each account or group of accounts whenever the report group is run. This is useful for generating client statements which incorporate multiple sub-reports. Several standard report groups are provided with the Pro/Enterprise Captools/net installation. These are intended primarily as examples, most users will typically construct their own groups using the "Create Report Group" function.
Report Action Icons - Each report listed is accompanied by two to four adjacent icons. These can be clicked on for the following actions:
![]() - Run the report.
- Run the report.
![]() - Edit the report template, to change the selection of data fields or the report appearance.
- Edit the report template, to change the selection of data fields or the report appearance.
![]() - Clone the report template. The cloned report may be run or further edited to obtain a customized report.
- Clone the report template. The cloned report may be run or further edited to obtain a customized report.
![]() - Delete the report. This removes the report template.
- Delete the report. This removes the report template.
Standard reports may only be Run or Cloned, and thus omit the Edit and Delete icons.
Simply clicking upon the Run Report icon for a report produces the Run Report specification screen. This dialog is used to specify the Accounts, Dates and output methods to be used for the report:
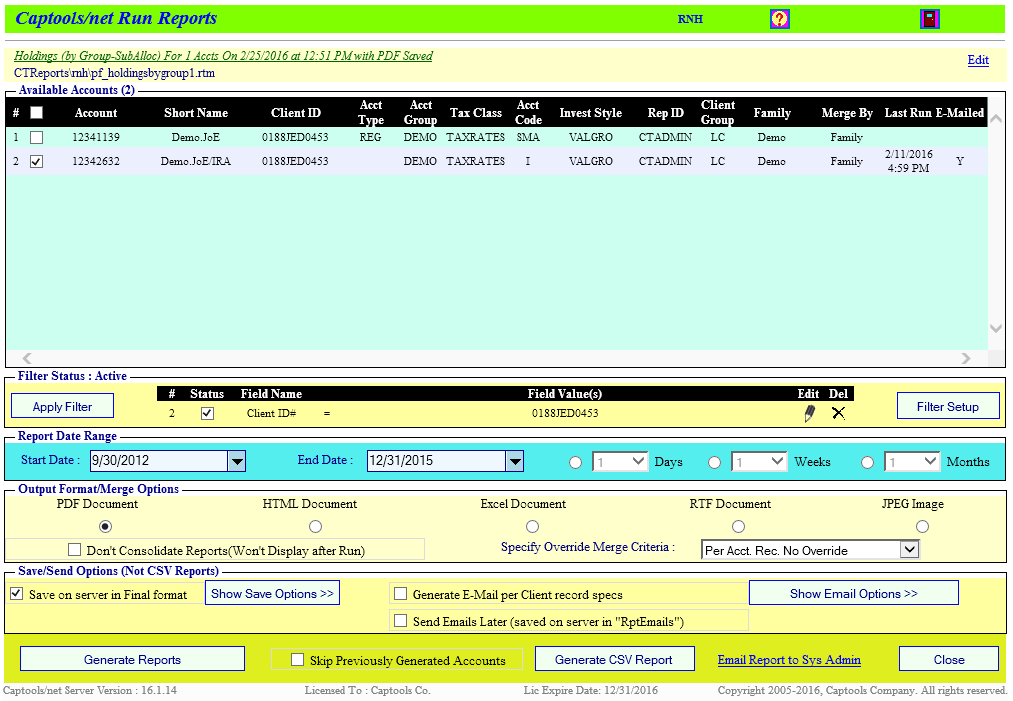
To run the report you must:
1) Select at least one account against which to run the report. If you check the topmost check box, appearing in the header, this will select/deselect all accounts appearing in the list. You may use a Filter to limit the list of accounts to only those accounts which meet the Filter criteria. Click the Filter Setup button to define a filter, then the Apply Filter button to apply it.
2) Specify a report date range. For certain types of reports, such as holdings reports, only the End Date is significant, because such reports involve account data only at one point in time. If either a starting and/or ending date is required to coincide with a portfolio valuation, then the earliest available prior valuation(s) will be used if the specified report run dates do not exactly match the valuation dates found in the database for the selected accounts. Hint: The Start Date may be specified by setting the "End Date" and then specifying the Days, Weeks or Months interval and checking the "Apply" check box. For many reports, the Start Date may also be specified within the Report Special Options by specifying a report "Periodicity". In the example above, if the periodicity is set to "6M", and the latest valuation is 6/30/2004, then the start date will be computed as 12/31/2003 at the time the report is run.
3) Specify an Output Display Format. When a report is run from this interface (as opposed to being triggered by the scheduler), the output will always be sent to the display of the computer from which it was initiated, in the format you specify here. PDF or HTML are the preferred formats. Your selection may depend upon whether you plan to only view on screen in which case HTML may be preferred, or later plan to e-mail or print the report document (PDF preferred). Higher level Pro/Enterprise versions will also optionally encrypt PDF output using the password specified in the applicable Client record (Reports/Misc section of the Client record Edit view).
Other Report Output Formats: The other format options show above (RTF, Excel, JPEG) may be reserved for higher level versions of the software where users may have special requirements to incorporate the report in other documents. The Excel format should not be used for report containing charts, and may produce varying results depending upon the version of the spreadsheet you use to load the output. The Excel output format is primarily intended for if you want to further manually modify the reported data or want to export the data for import into another application. Since the generation of the Excel and other alternative output formats is controlled by third party software components we cannot guarantee that it will produce expected or useable output layouts in all cases. We have nonetheless included these alternatives for the users convenience.
4) Specify Client Destination Options. These options determine where the output of the report will go when the report is run. In all cases, if you leave the browser window open after clicking Generate All Reports, then the report output will appear on your display once the report computations are complete. If you are running a report against a small number of accounts, you can let the report appear and then print it locally after it appears on the display. If running a multi-user Pro or Enterprise version, you may optionally specify alternative report destinations, which facilitate closing the browser after clicking Generate All Reports and allowing the server to generate, print, save, and/or electronically deliver the reports as follows:
Print to Server Printer per Client Record Specs - This option specifies that the report be queued to the server computer's default printer as soon as the report has been generated. This will only queue reports for clients whose client record specifies that they want reports.
Email/Fax to Client as per Client Record Specs - This option specifies that a copy of each client's report be immediately sent to the client by EMail or Fax, provided that one or both of those options have been specified in the client's record. If you are not certain that your data is "clean" you should generally first run the report with the Save option, review the results, and then run the report with this option selected after you have verified the accuracy of the report output. Emailed reports are always sent in PDF format.
5) Save Settings - Click on "Show Save Options" button to specify how the report is to be saved on the server computer's hard drive, where you can review the output at a later time, and then print, or regenerate and electronically send to clients. Saving the report allows you to view and print it at a later time in the desired output format, by using the "Show Saved Reports" button on the Report Selection screen. See Saved Reports for more details on this topic.
6) E-mail Options. This option, permits you to send a PDF copy of the reports generated to the e-mail addresses specified in the client's records and to the internal email addresses you specify. When the "Email Options" button is used these specifications are shown as part of the report run specifications as follows:
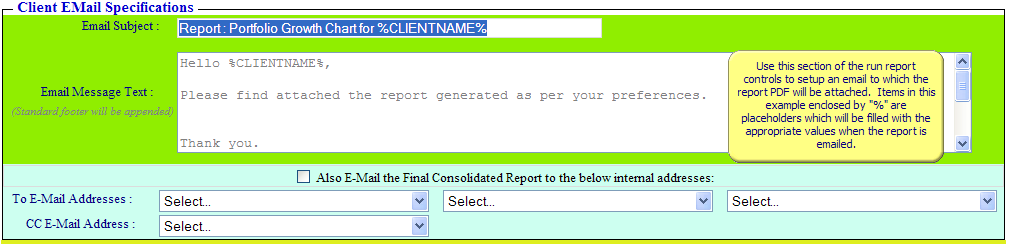
See the topic E-Mail/Fax Reporting for more details on this control.
6) Click on Generate Report. This triggers the report generation process. While the report is being generated you can optionally open the report log to view the progress of the report generation. If the report is not complex and involves relatively few accounts it will appear shortly in your browser. If it is more complex and/or involves many accounts the generation process may take some time, the amount of time also depending upon the computer's processing speed. In this case you can minimize the browser and proceed with other tasks, or if you are saving the report to file, close the browser entirely and even shut down your computer as long as it is also not the server computer.
Report Output
When the report has been generated, it will appear in your default browser (e.g. MS-Internet Explorer), similar to the following:
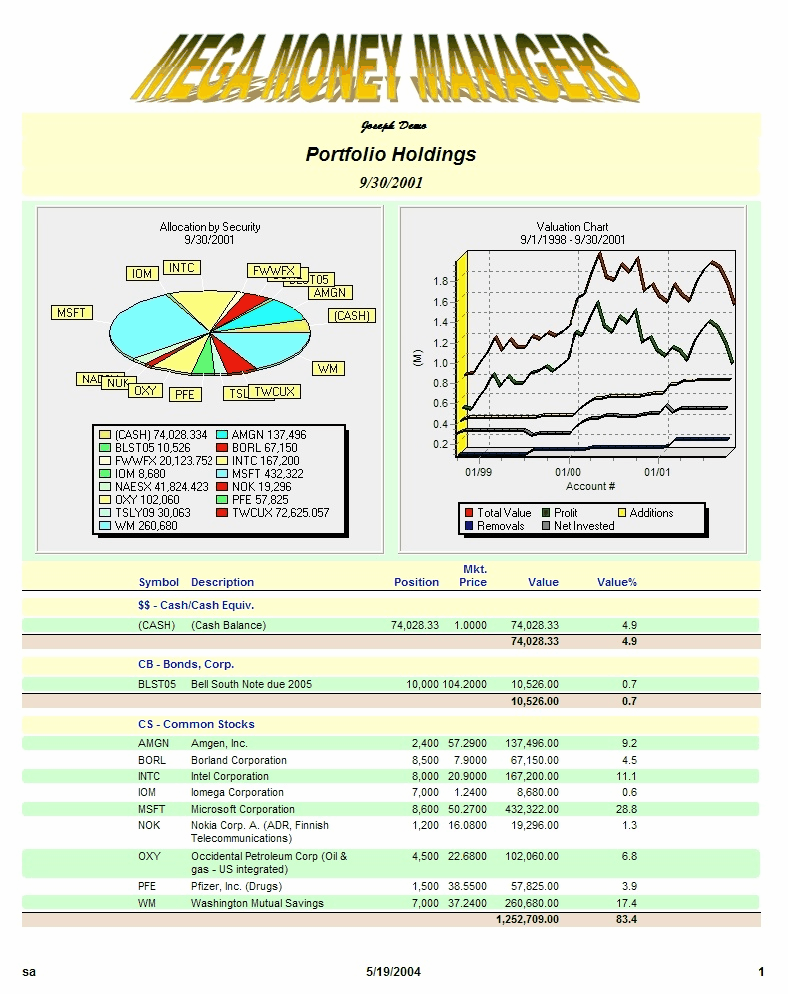
This example report is a bit "over-the-top" in terms of coloring and effects, simply to show that this capability exists. Customization to achieve such effects will be discussed in more detail in under the topic Creating/Customizing Reports.
If you need to print your report to paper you can simply use your browser's "Print" command. If you are operating one of the higher level versions of Captools/net and need to generate reports for a large number of accounts, you may find that it is easier to run these reports as a scheduled task, discussed further in the topic AutoReport Task.