|
Scheduled & Saved Reports |

|

|
|
|
Scheduled & Saved Reports |
|
|
Scheduled & Saved Reports
|
Scheduled & Saved Reports |
|
|
|
|
Scheduled & Saved Reports |
|
|
Two powerful reporting capabilities supported by the higher level Pro and Enterprise versions of Captools/net are the ability to generate reports sets, which can be run at a scheduled time and to generate and store saved reports for post report generation review and archiving purposes. These capabilities are accessed through the Report Management Options controls appearing at the bottom of the Captools/net Reports Main Menu page:

Report sets are reports that have the account selection and run dates pre-specified. These can be run at any time the user desires, or can be run by the Captools/net Tasker (see Scheduled Tasks) when it reaches the "AutoReports" task at the Tasker's scheduled runtime. Scheduling reports to be run by the CTTasker allows you to automate the reporting process and also time it to occur at a time in the day when the server load is otherwise light. See the topic Using Schedule Reports, below for a discussion on how to most productively make use of schedule reports for client reporting.
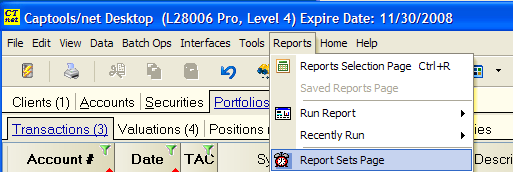
The Report Sets utility, can be accessed from the Captools/net Desktop using the "Reports/Reports Sets" command:
This command produces the browser based controls shown below, which allows you to select which reports you will generate for the accounts you manage. Additionally, you can choose to save reports to the server hard drive for later viewing, and/or printing, e-mailing, or faxing per the client record report specifications.
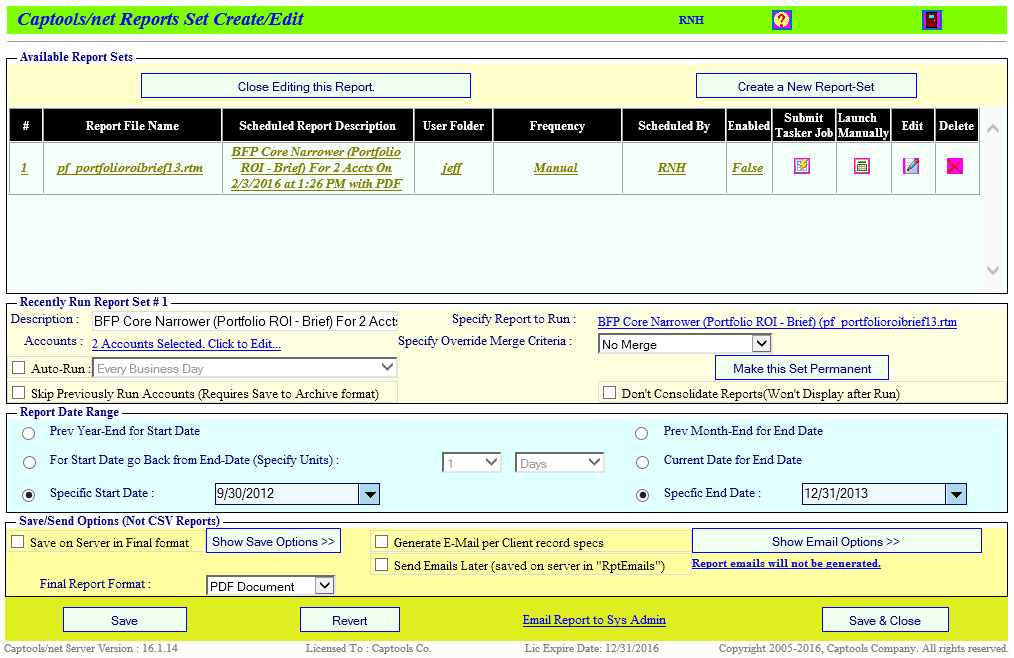
This utility shows you the scheduled report queue, and controls for each scheduled report:
Add/Remove Scheduled Report - Use the "Create a New Scheduled Report" to add a new report, then click on the "Select Report" link appearing next to the "Run Report" Label. This will provide a list of reports (see graphic following "Run Report" item below). Clicking upon the "minus" icon in the schedule report record removes it.
Scheduled Report Description - This permits you to add a description to help you identify the report in the future.
Ignore Merge Criteria - When schedule reports are run, the report merge criteria specified in account records will be implemented, excepting if this item is checked.
Auto-run Scheduled Report - This box must be checked for the report to be triggered. If you want to suppress a report, you can uncheck this box, and then later on check it to resume use of the report.
Frequency - This item specifies the desired frequency (daily, week-ending, month-ending, quarter-ending or year-ending). You should be aware that the frequency specified will be adjusted by the days offset specified in the CT Tasker controls for the AutoReport Task. E.g. if you specify a five day offset for the month-end reporting task, the report will be generated on the fifth day after the last business day of the month, with the report end date being the last calendar date of the month.
Report Date Rate - This control allows you to specify the start and end dates for the report. This can be a specified date, but more likely will be the most recent month end for the end date, and a start date which is specified in terms of number of days or months prior to the end date.
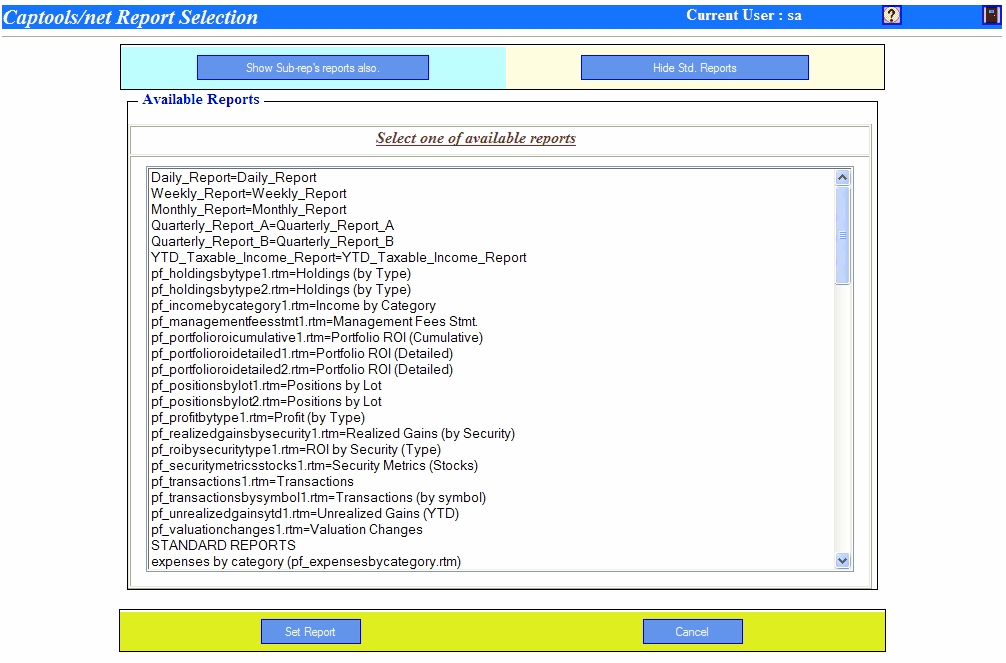
Run Report Name - Click on the link to specify the report to use (either a single report or report group):
Reporting Accounts - Click on the link for this control to select the accounts for which the report is to be run:
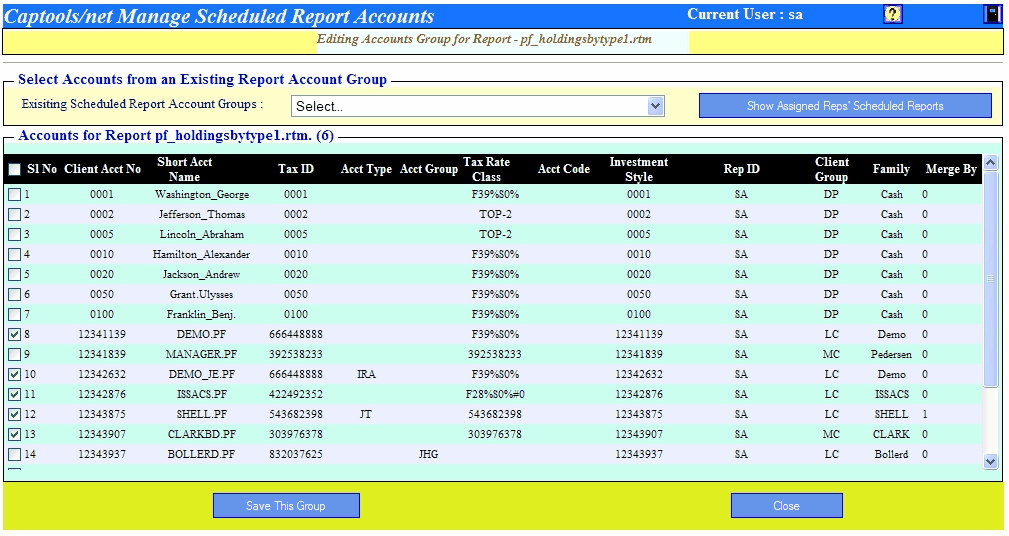
If you want to use the same accounts as you've previously specified for another report, you can select from the "Existing Scheduled Report Account Groups" control.
Saved Report Specifications - These allow you to specify how your want the reports saved. The "Archive" format (see sub-topic below) will save reports in an internal "RAF" format from which PDF HTML and other formats can be generated. These archived reports can be reviewed later using the Saved Reports function described in the next topic. This is convenient for generating reports overnight and then reviewing them the next day. The "Save on Server in PDF format" option saves the reports in PDF format in the folder specified via the Captools/net Server Control Panel. This is convenient if you want to host these reports on your web server:
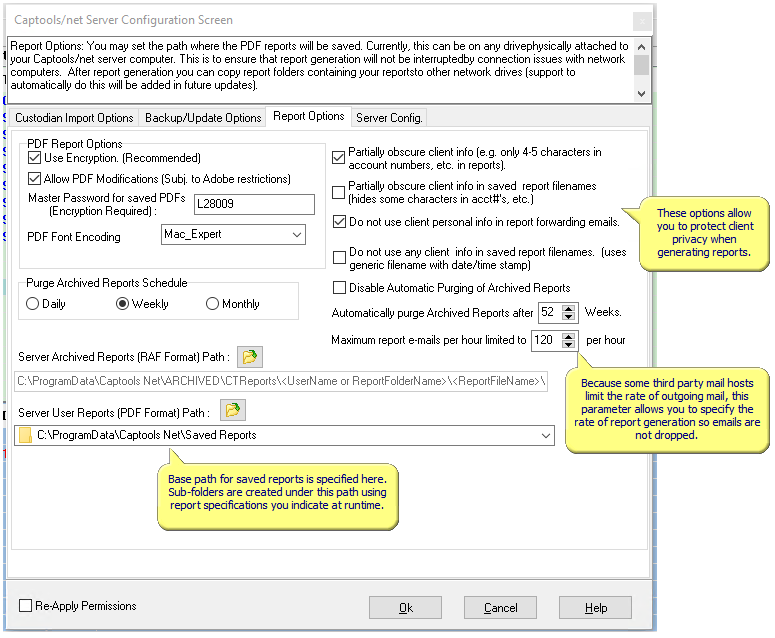
Important: If you use the "Do not user Client Personal Info while saving reports" option, and have many different accounts, the accounts will be difficult to identify on your hard drive. Thus most users will want to leave this option unchecked, but leave the corresponding "Do not user Client Personal Info while E-mailing" checked.
Send Reports to Clients - Check this box if you are generating the reports and want to send them to the clients as specified in their client record.
Show Email Options - This control allows you to set up the e-mail which will forward the report PDF, and also allows you to specify internal recipients of copies of the email.
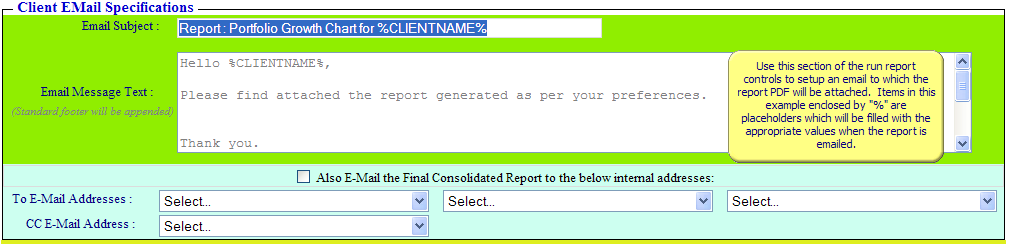
Please see the topic E-Mail/Fax Reporting for more details on this control.
When reports are run, you can specify that they be "saved" on the server's hard drive for a limited time for later viewing or printing. An example of when this might be useful is when scheduled reports for a large number of accounts are generated over night, with the results saved to disk for review and printing the next day. The "Show Saved Reports" function (or "Reports/Saved Reports" command on Captools/net Desktop) gives you access to these reports, through an interface that allows you to select reports for viewing based upon the rep to whom the account is assigned:
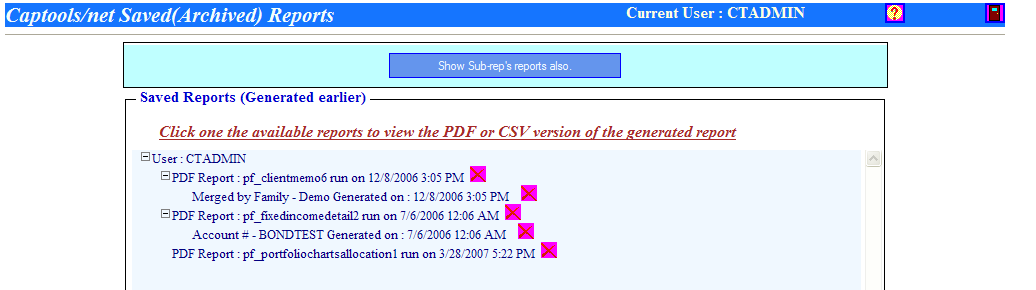
Clicking on the "plus" next to a rep identifier shows the available reports, and clicking on the plus next to each report shows the accounts contained therein. Clicking upon a particular account allows you to view the report for that account. Clicking on the report identifier allows you to view a consolidated version of the report which shows all accounts contained therein as a contiguous document. Clicking on the "X" icon to the right of the report deletes the report file from the server. However, eventually, automatic deletion of "stale" reports can be implemented via a scheduled "cleanup" task (see Scheduled Tasks).
Saved Report to a Custom Sub-Path
The basic path to where your reports are saved are specified on the Server Control Panel as indicated above under the subtopic Saved Report Specifications.
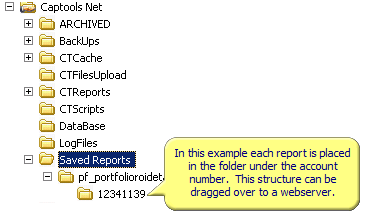
You can further specify where you want to save your reports by using the "Placeholder for Path" option in the Saved Reports Specifications as follows (see File Placeholders for list of placeholders):
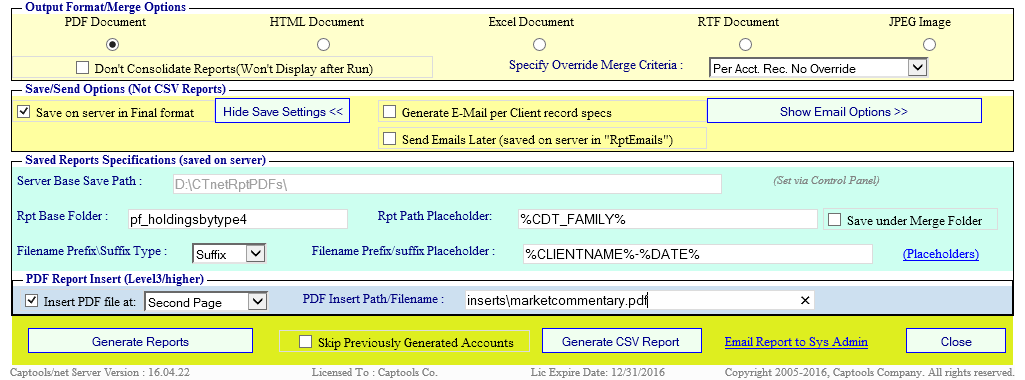
This will add a path element generated at report runtime so that each report is put in a subfolder whose name is specified by the placeholder, e.g.
PDF Report Insert
In the screen view above, the section labeled "PDF Report Insert" permits users operating at the indicated software level or higher to specify that a static PDF document be inserted into the Captools/net generated report. The prerequisite for this is that the output format must be PDF and the report must be indicated to be saved in final format. The inserted PDF document will appear in the individual client report PDF files, including emailed reports, but not appear in the "consolidated" output to user's screen upon completion of the report run. If you are using the "email" option you must use the "send later" option because this saves the base report PDF which is a prerequisite for the merge to occur because the merge is a file to file merge, not a stream to stream merge.
Archived Reports
Saved reports, described above, store the output of a report until the next instance of that report is run, at which time the earlier report output is overwritten with the new output. Thus if you have a report that is scheduled to run weekly, last week's output will be overwritten when the report is run this week, on either a scheduled or manually run basis. If you wish to store the output of reports permanently, they should be archived. Higher level Pro/Enterprise versions automatically implement archiving sending a copy of any report which is e-mailed to either a client or internally (using the Management Email Options) to the server. Such archived reports may be retrieved from the server by the system administrator, through the server's e-mail program. Reports which are not emailed are presumed to be "test" reports, and thus are not archived. However if you want to retain a copy of such a report, you should open it on the "Saved Reports" page (see above) and save it on your hard drive.
Scheduled reports offer the advantage of eliminating the process of manually triggering report generation and then waiting for report completion. However, in order to productively use scheduled reports you will need to ensure that your account data is "clean" prior to running reports. One reason for this, is that if your scheduled reports specify to e-mail reports to clients, the e-mail process occurs at the time the report is generated. We suggest implementing the following if you are going to use scheduled reports:
1) Review your CT Tasker Days Offset settings for the Custodian Imports, Data Download, and Batch Valuation tasks to ensure that your data will be complete for the report end date at the time the AutoReports task is scheduled to trigger. Since most custodian data is not available until at least one business day after transactions executed, a minimum of one business day offset will normally be required for the Custodian Import and Batch Valuation tasks. However, you may want to provide at least several additional days to allow for custodian corrections to data as well as to allow yourself time to confirm data integrity.
2) Make sure your CT Tasker Days Offset settings for the AutoReports Task allow sufficient time to review data integrity before the Auto Reports task triggers. Captools/net forces the AutoReport task to always triggers after the corresponding Batch Valuation Task, i.e. the AutoReport task must have at least the same days offset as the Batch Valuation Task. However, in order to give yourself time to review the reconciliation results generated during the batch valuation, you should set the days offset for the AutoReport setting to at least one more day than for the Batch Valuation task.
3) Review your Reconciliation records after the Batch Valuation task has run, and before the AutoReport task triggers. The Reconciliation records compare the account holdings as recorded by Captools/net versus the holdings information provided by the custodian, with discrepancies marked in red. Discrepancies should be resolved before reports are allowed to run. If you need more time, you should re-set the AutoReport days offset in the CT Tasker to give you that time. Reconciliation discrepancies are generally resolvable through transaction or pricing changes in the affected accounts, although occasionally a custodian error needs to be corrected. See the topic Data Reconciliation for more information.
4) Although verifying data reconciliation will often be sufficient to ensure that your data is clean for certain types of reports, such as holdings reports, it may be prudent to perform additional previews before automatically sending other types of reports to clients. Reports covering a span of time, such as performance, income and realized gains reports can be previewed by running these reports before they are scheduled, e.g. the day before, but not allowing them to be sent to the clients. This can be done by checking the "Don't Send to Clients" option, setting the internal email option to send yourself the result and then clicking the Run Report Now button on the scheduled reports control. When your receive these preview reports, be sure to verify them before the scheduled report is triggered.